
So, after learning the Linux terminal my father recommended that I learned nmap. What it is, how it works, and how to use it. At first I didn’t realize how important this tool was to learn until I really started working on hackthebox, and other labs.
Nmap is that one tool that you need to have to even begin the process of hacking. I am going to show you my main nmap scans that I run on every host before I do anything else with them, as well as explain the command the best that I can.
Nmap is a networking reconnaissance tool, that allows you to gather information off a host or network. Nmap will allow you to discover what ports are open on a host, as well as what service are running on those ports, and even if there vulnerable to anything. I am going to be using the box networking on HTB to run my nmap commands to demonstrate the main scans that I run once I find a host I want to target.
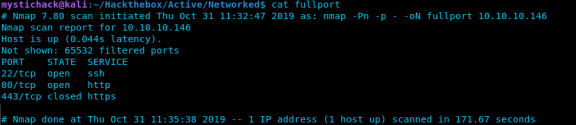
This is the first command that I will run against any host. This command allows me to see all of the open ports on a target! So let me break down these options
- -Pn <- This options tells nmap not to discover hosts, which helps speed up the scan. Now if I am targeting a network I will not use this as I don’t know the hosts that are on the network.
- -p – <- This tells nmap to scan for all 65,535 ports, not just the top 1,000. I want to know everything that is open on the host.
- -oN fullport <- the flag -oN saves the nmap output to a file called fullport. Saving your scans has a multitude of benefits.
As we can see from this scan we have 3 ports that are open, and we know what is running on those ports, but we don’t know what anything else. So lets add in a few more options and explore or target a little more.

- -sV <- this tells nmap to enumerate the services to figure out what version the service is running on, this is great because it tells us if they are using an outdated potentially vulnerable service.
So the next scan is nmap safe scripts, to do some reconnaissance on the service version.

- -sC <- tells nmap to run safe scripts and enumerates more on the open services. You can not run -sC by itself as it doesn’t know what version to scan for, which is why it also needs the option -sV
Next, I want to figure out what the operating system running on this host is. which can easily be accomplished but does need sudo permissions.

- -O <- this command also runs off the information from -sV and tells nmap to guess based on the services what OS the host is using. In this case Linux 3.10 – 4.11
And this is the last command that I run before I proceed with trying to hack the host.

- –script vuln <- tells nmap to run the vuln script against the host, which will take the information from -sV and look for all CVE’s related to that service version.
Now people familiar with nmap may ask why I run so many separate redundant scans when you can just combine all the options into a single scan. I have a few reasons for this.
- Running each scan separate greatly helps when looking through the output as it is more organized than just an all inclusive scan.
- I am not trying to be quiet, I don’t care if the host sees that I am scoping them out.
- By running these scans separately, It takes a lot less time to give me information compared to running an all inclusive scan.
Hopefully these 5 “main” scans will provide some assistance when going at your next target, and is the first thing that I do when I look at a new host. There are many more things nmap can do, but I have found these five to be the “essential” scans needed in order to begin hacking your target.
Nmap is an amazing tool and I highly recommend you learn more into how it works and figure out some different options that could prove useful in your recon phase.
https://nmap.org/book/man.html